
Set up
Control Nest.
Install AutoPiHub on your Pi, pair it in the app, and add your devices.
What you need.
Control Nest provides the shared API and Cloudflare tunnels. You set up the app, your Raspberry Pi, and the devices connected to it.
- A Raspberry Pi running Raspberry Pi OS, with a suitable power supply and storage.
- A Pi user with
sudoaccess, pluscurlandtarinstalled. - An Android phone with the Control Nest APK installed.
- Internet access and the same local network for your phone and Pi during pairing.
- Relay hardware rated for the devices you want to control.
Check your connections.
Use the original relay diagram as a reference for your hardware.
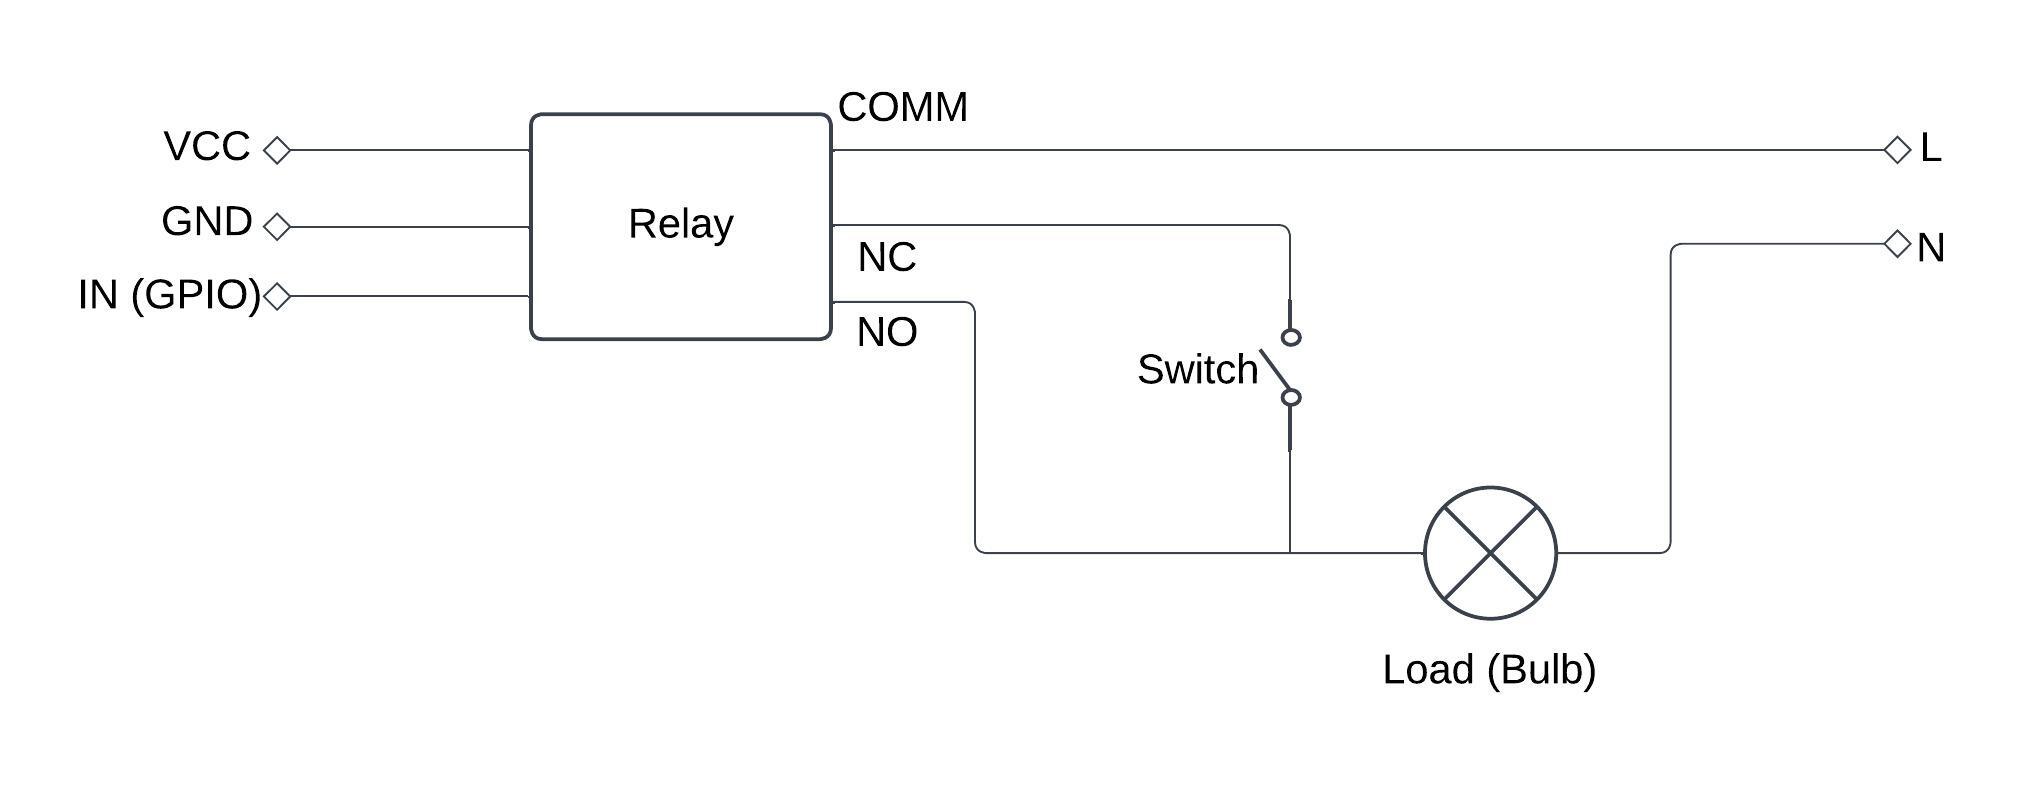
Do not connect mains voltage to Raspberry Pi GPIO. This diagram is a reference, not a complete wiring plan. Have a qualified electrician choose the relay ratings and install mains wiring.
Install AutoPiHub.
Connect the Pi to your home network. Open its terminal or connect over SSH, then run:
curl -fsSL https://raw.githubusercontent.com/Tauqeer-Ahmed-99/Control-Nest-v2/main/controller/scripts/install.sh | bashRun this as your normal Pi user. The installer uses sudo when needed. It installs AutoPiHub and starts it as a service that runs on boot. The project goes in ~/Control-Nest-v2.
When installation finishes, check that the service is running:
sudo systemctl status autopihub --no-pagerLook for active (running). Keep the Pi powered on, then create your house and pair it below. After pairing, follow Updates and recovery to enable signed controller updates.
Pair your controller.
- On this website, create your account with your email, first name, and last name. Verify your email address.
- Open My houses, create a house, and add a named controller. Copy its API key. The full key is shown once.
- Connect your phone and Pi to the same trusted Wi-Fi network.
- In Control Nest, sign in with the same account and choose your house.
- Open Settings > Controllers > Connect a controller, or Add > Controller. Allow local network access and select your Pi under Nearby controllers.
- Paste its API key and tap Connect controller, then Done. Choose Open house when ready.
Create a separate controller entry and key for each Pi. Repeat these steps to connect more Pis to the same house. Members use their own accounts for everyday control.
Prefer to pair on the Pi? After installation, run the command below and paste the key at the hidden prompt. The script stops AutoPiHub during setup and restarts it afterward.
bash ~/Control-Nest-v2/controller/scripts/setup.shPairing sets up your remote connection automatically. To control devices away from home, keep the Pi connected to the internet and sign in to the app.
Add rooms and devices.
- Tap Add > Room and name a room, such as Living room.
- Tap Add > Device, enter its name, and choose its room.
- Select its controller and an available header pin connected to its relay. Match the app selection to your wiring.
- Optionally add a power rating in watts for energy estimates, then save the device.
- Turn the device on and off in the app. Confirm the connected device responds.
Physical header numbers and BCM GPIO numbers are different. Use the app's pin mapping to select the correct connection. Test with a low-voltage load before connecting other equipment.
Set a schedule.
Open a device, enable its schedule, and select the days and on/off times. Save your changes.
AutoPiHub runs schedules on the Pi. Keep it powered on and check that its time and timezone are correct.
Updates and recovery.
Enable controller updates once
From your trusted installation, connect over SSH and run these commands as the normal Pi user:
cd ~/Control-Nest-v2/controller
bash scripts/bootstrap.sh
This installs the protected updater and preserves the Pi's identity, pairing, and data. If the app reports Bootstrap required, complete this step before starting a controller update.
Update a controller
- Sign in to Control Nest as a house admin.
- Open Settings > Firmware updates and find the controller.
- Review its available version and release notes. Start the update when one is available, then follow its progress here.
The updater installs an eligible signed release and snapshots persistent data. If activation fails, it restores the recorded working release and data. Installation continues if you close the app or your phone disconnects. Keep the Pi powered on.
Update the app
Open Settings > App updates, tap Check for updates, and restart when prompted to apply a downloaded update. Some changes require a new app build. Use Install app build when offered, or get the published Android APK.
Recover a controller
In Firmware updates, use Restore when a previous release is available. For LAN recovery, a house admin must prepare recovery access while online. The saved authorization lasts up to 24 hours and can restore the recorded working release over the local network. Without valid recovery access, use authenticated SSH or physical owner recovery.
Read the recovery instructions before attempting restoration. Raspberry Pi OS updates are separate maintenance. Get published downloads and installation notes from GitHub Releases.
Connection not working?
The Pi does not appear in the app
Check that AutoPiHub is running, your phone and Pi share a local network, and the app has local network permission. Guest Wi-Fi and VPNs can block discovery.
Pairing or login fails
Check the internet connection on both devices. Sign in again and retry. Use the complete key for this controller. If it was lost or revoked, replace it in My houses and paste the replacement on the same Pi.
Remote control fails
Check the Pi's power and internet connection. If the service is running and the problem continues, contact NMT Solutions OPC Pvt Ltd.
A device does not switch
Check the selected header pin, relay power, and wiring. Disconnect power before changing connections. Use the device control history to check whether the command reached the controller.
A schedule runs at the wrong time
Check the selected days, on/off times, and the Pi's timezone. Run timedatectl status on the Pi to check its clock.
Check the controller logs
sudo journalctl -u autopihub -n 80 --no-pagerIn the app, open Settings, then Request history to inspect a failed request.